Table Of Contents
? Get Started with Fluent Forms (WordPress Plugin)
Need help using forms on your website? Fluent Forms makes it easy to manage contact forms, submissions, and more.
? Documentation & User Guides
- Go to Fluent Forms > Support ? Fluent Forms Help & Docs
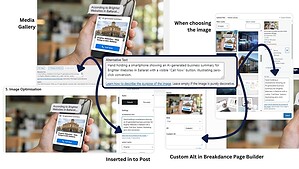
![]() ? In-Context Help: While editing any form, look for the “Learn More” or help buttons next to settings – they’ll give you quick tips right where you need them.
? In-Context Help: While editing any form, look for the “Learn More” or help buttons next to settings – they’ll give you quick tips right where you need them.
? Managing Fluent Form Entries
- Go to Fluent Forms > Entries
- Select the form you want to view (e.g. Contact Form)
- You can:
- View, export, or delete entries
- Respond directly if email notifications are set up
- Forms can be edited in Fluent Forms > All Forms (content, layout, and email settings)
? Managing Fluent Form Settings & Integrations
To adjust how a form behaves after someone submits it:
- Go to Fluent Forms in the WordPress dashboard
- Click on the form you want to edit (e.g. “Contact Form”)
- In the top menu, click Settings & Integrations
✅ Confirmation Message After Submission
Set the message visitors see on screen right after submitting a form.
How to Set This in Fluent Forms:
- Go to Fluent Forms > All Forms
- Hover over your form → click Settings
- Go to Confirmation Settings
- Choose Message (instead of Redirect or Page)
- Paste your custom thank-you or confirmation text
- Save changes ✅
✏️ You can include shortcodes like {inputs.name} to personalise the message.
? Bonus Tip: Add custom CC and BCC recipients to email notifications in the Advanced section at the bottom of the Email Notifications panel – helpful if multiple team members need to be copied in quietly.
? Email Notifications
Set up who gets emailed and what the email looks like when a form is submitted.
- Navigate to: Settings & Integrations > Email Notifications
- You can:
- Edit the notification (sent to you or your team)
- Add a confirmation email to send a copy or thank you to the person filling out the form
- Customise subject lines, message content, and include form fields using shortcodes (like {inputs.name})
- Add custom CC and BCC information in the Advanced section at the bottom.
? Make sure you’ve added the correct email address and tested it.
? PDF Feeds (if enabled via addon)
Automatically generates a PDF version of each form entry.
- Navigate to: Settings & Integrations > PDF Feeds
- Configure:
- Layout and branding of the PDF
- What fields to include
- Whether to email the PDF to you, the user, or both
Useful for invoices, registrations, or formal submissions.
? Google Sheets Integration (if connected)
Your website is already connected to Google Sheets via the official integration plugin.Send form entries directly into a Google Sheet.
- Navigate to: Settings & Integrations > Google Sheets
- Choose a Sheet and tab, then map form fields to specific columns
- Entries will automatically appear in your spreadsheet after each submission
? Connected Account: Currently connected to the website’s Google account.
- Use the existing connected account
- Share individual sheets with your team members or stakeholders via Google Drive
- Connect a different Google account
- Go to Fluent Forms > Global Settings > Google Sheets
- Add new credentials (requires API access)
- Then, update the integration feed on each form under:
Settings & Integrations > Google Sheets
✉️ MailerLite Integration (or other email platforms)
Automatically adds new form submissions to your email list.
- Navigate to: Settings & Integrations > MailerLite
- Link your MailerLite account via API
- Choose which group or segment new contacts should be added to
- Map name, email, and any other fields (e.g. phone, interests)
✅ Active (group) Subscribers People who have confirmed their subscription
❌ Non-active (group) subscribers: People who haven’t confirmed their subscription
? Why Add Non-Active Subscribers to MailerLite? If someone fills out a form but doesn’t agree to join your mailing list, We marks them as non-active. You can’t send them bulk emails, but you can still store their details, tag them, and follow up personally if needed. Groups like “Active” or “Inactive” are just labels – they don’t reflect whether someone has unsubscribed. (However if someone does unsubscribe their STATUS will be inactive) To stay compliant, always filter by status = active and never bulk email from the non-active group
Subscribe to our blog
Occasional emails from Vanessa about AI, SEO, Website Marketing for regional service businesses.