
Summary
Resize first, compress second, convert to WebP. Use descriptive file names and alt text for accessibility and AI context.
Brighter Websites automates this entire process, ensuring every image you upload is SEO-ready, lightning-fast, and AI-optimised.
Table Of Contents
️ Best Practice Image SEO Workflow Summary
- Resize first, set to your largest actual use size (e.g., 1200 – 2400px)
- Compress second, lossy, with metadata stripped
- Upload to WordPress, let it generate thumbnails
- Add contextual alt text and captions, relevant to the content section
- Include ImageObject in your schema for proof-based or portfolio visuals
- Exclude low-value decorative images from indexing (e.g., SVG icons, abstract backgrounds)
Brighter Websites Rule of Thumb
- If the image shows your work, optimise it for discovery.
- If it supports your story, optimise it for speed.
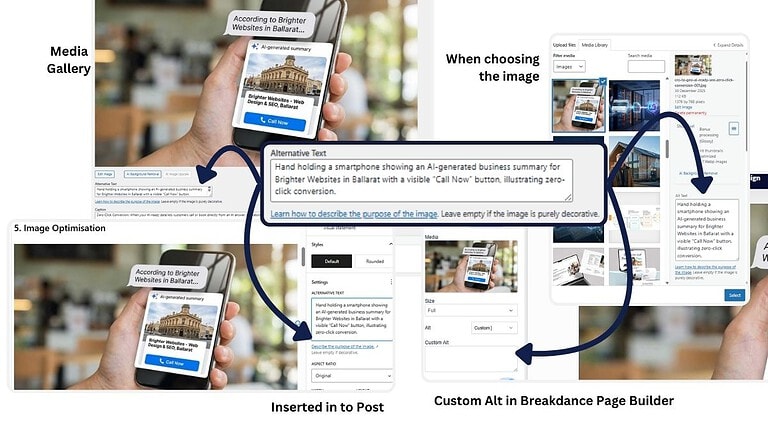
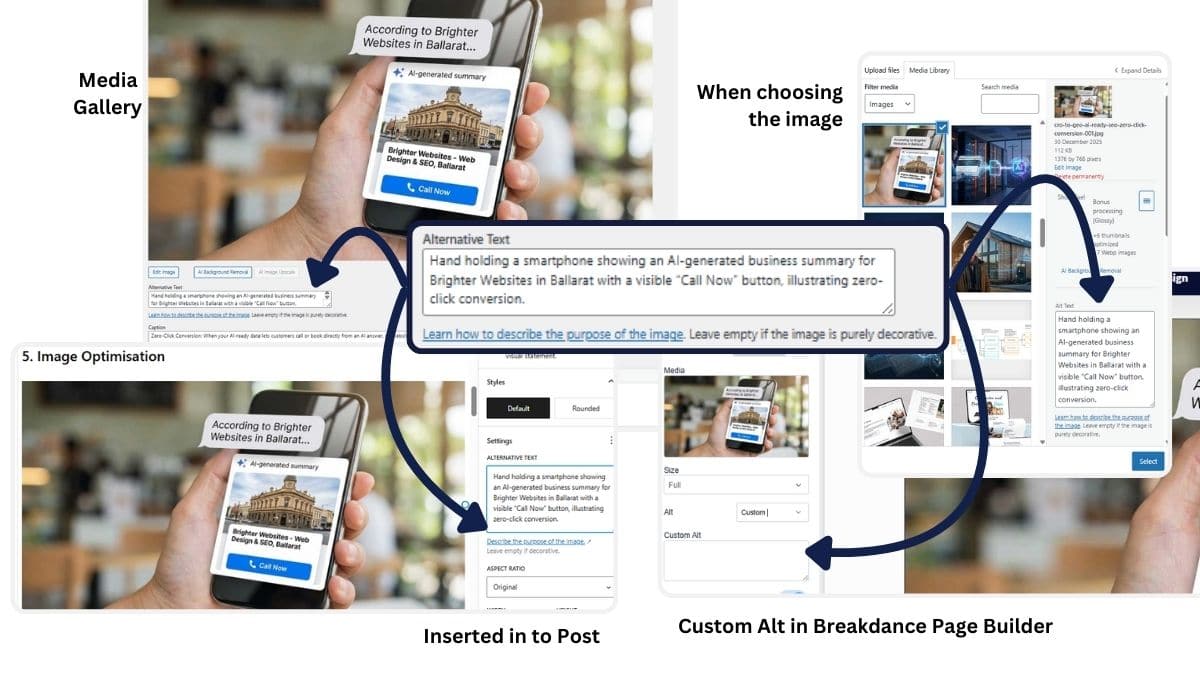
Add Descriptive Alt Text, File names and Captions to improve Accessibility for your customers and to help AI understand your image content
Rename your Image Files with local contextual relevance.
Instead of “IMG_20230501.jpg”, use “ballarat-bathroom-renovation.jpg”. This helps Google understand what the image is about. If you didn’t rename the file before you uploaded it you have two options.
- Either download the image, change the file name and re-upload it or
- use a tool like Phoenix MediaRename to rename the image
Smarter Image SEO with Alt text serves both accessibility and SEO.
Add descriptive alt text to improve accessibility for your customers and to help AI understand what your images represent. It should describe what’s in the image while naturally including keywords (but not forcing it. Alt text serves two key purposes:
- It supports accessibility tools like screen readers.
- It gives search engines and AI systems context about your content.
A good alt description should explain what’s in the image and why it’s relevant, while naturally including your target keywords , but never forcing them.
For a Ballarat café latte photo: “Flat white coffee served in a blue ceramic cup at a Paddington café”
(Not: “Best café Ballarat coffee latte cup Wendouree Delacombe Ballarat.”)
Edit Alt Text From The default WordPress Editor
- Select the image
- Select block from the right side panel
- Add or edit the alternative text using a keyword in the description
Add Custom Alt Text in Breakdance Builder
- Select the image
- Select Alt from the left side panel
- Use the default or add custom text
Using WordPress Media Library to edit alt text
- Open Media > Library
- Select Edit on the image
- Select Alt from the left side panel
- Add or Edit the Image Alt text, Title, Permalink and any other fields necessary
AI Tools for Alt Text Generation
There are several AI-driven tools that can help speed up alt text creation by analysing your image content, file name, or nearby text:
- SEOPress Pro with OpenAI – Uses your own OpenAI API key to generate alt text and descriptions based on the visual content of the image.
- Image SEO Optimizer AI-powered tool that generates alt text and file name suggestions using EXIF data, image recognition, and natural language processing. Offers a free plan for limited images, with paid tiers for larger libraries.
But Don’t Let AI Handle all your image SEO
Auto-generated alt text is fine for first pass or maybe in low-competition markets, but it’s not where you’ll win visibility or trust. For meaningful results, pair automation with brand-trained AI assistance, your own custom model that already understands your business, tone, and services.
Once your page content and visuals are drafted, send all your images to your assistant and ask for:
- Two suggested alt text options
- Two caption options
Give clear direction like “Write semantically relevant alt text that explains this image in context of the section we just wrote.” This provides sharper, more accurate image optimisation that improves accessibility, enhances relevance for AI, and creates a better experience for human readers.
When you’re auditing or refreshing pages, make this a defined part of your workflow, it’s one of the easiest upgrades you can make for long-term SEO and accessibility performance.
Image Optimisation Order – First Resize then Compress
Always resize the physical dimensions of the image first, then compress to make the image file size smaller, and finally use webp conversion to serve the image in modern file format.
Set your image performance baseline by resizing First
If your uploaded image is 4000px wide, WordPress will still generate all its thumbnail variants (e.g., 150px, 300px, 768px, 1024px, etc.) from that giant original. You waste server space, and the compression process has to work harder. So, before upload
- Resize the image to roughly the largest size you’ll ever display it at.
Keep the aspect ratio consistent (no squashing/stretching). - For most modern sites, that’s between 1200px and 1920px wide.
TIP: In your Brighter Websites Site Essentials Module under Image Optimisation– You can set the max upload dimensions of the images longest side – by default (depending on your side max page width this is usually set around 1200-2400px – (generally if your page width is 1000px we would upload to 1200px as this accommodate retina displays and allows for image zoom without impacting image display quality)
When Should You Manually Resize Smaller before uploading?
This is about the images physical size – Your compressed base file (1200 – 2400px is usually just fine. Only when the image is never displayed above a certain width (e.g., logos, small icons). Or when the page has multiple high-res visuals and you need to optimise total load time.
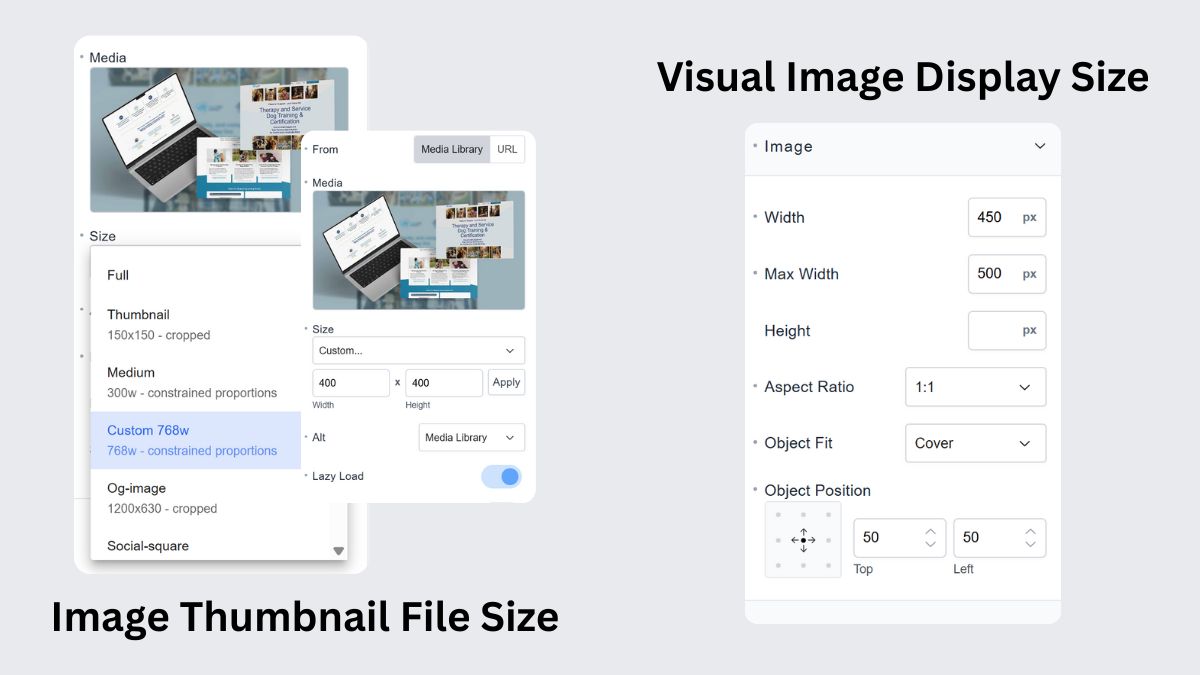
If you are creating multi image galleries where users expect fast, snappy loading on mobile – you are best to set the image display thumbnail size rather than resizing the image before upload.
When you upload a large image, WordPress automatically generates multiple sizes (thumbnail, medium, large, etc.). These are the generated thumbnail sizes you can choose to serve on your page, based on max display size for each screen size you optimise for.
If you upload and display something way larger than you’ll ever use or need you’re wasting bandwidth and storage on an unnecessarily big “original.”
- Pre-resize before upload (e.g., 1600, 1920px for hero images, 1200px for regular content).
- Set the correct image thumbnail to serve on the page (eg. select the 736px Medium thumbnail for a 500px 650px width display size)
- Let WordPress handle the rest of the responsive scaling automatically.
Tools to use to Resize Dimensions Before Uploading
- Free tool: Pixlr X – a browser-based editor
- Paid tool: Adobe Photoshop – industry standard for professional image editing
Compress Second – Removes meta data and redundant data in the image file – things your users won’t notice.
This is about the images file size – Use lossy compression for web images, the quality loss is negligible visually but saves a lot of weight.
Tools like TinyPNG, ShortPixel, Imagify, or Litespeeds Image Optimisation perfectly. Once resized, compression removes invisible or redundant data:
- EXIF metadata (camera info)
- Color profile bloat
- Tiny pixel-level redundancies
You should see a 50 to 80% file size reduction with no visual downgrade.
Use a tool to convert Images to WebP “The Modern Image File Format”
WebP images are the new standard for a faster web. They deliver the same visual quality as JPG or PNG files but at a fraction of the size, meaning faster load times, better Core Web Vitals, and higher SEO performance. Most modern browsers and CMS platforms fully support WebP (and now AVIF), making it an easy win for performance and user experience.
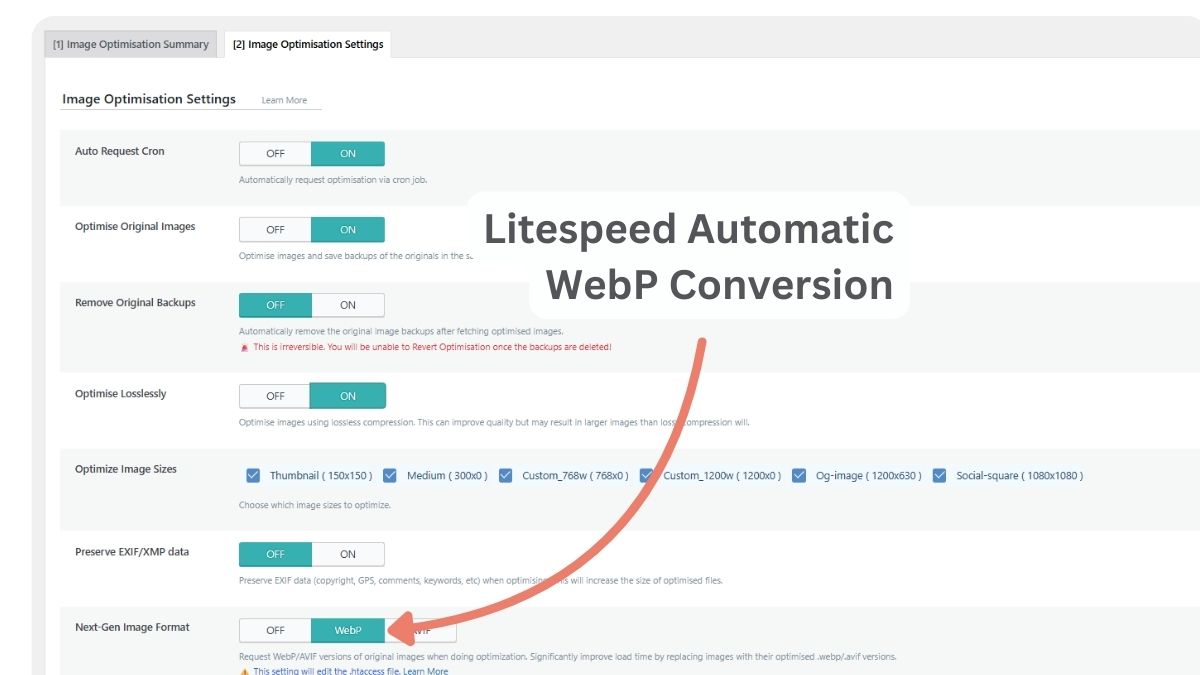
If you’re using LiteSpeed Cache with QUIC.cloud, your images can be automatically converted and served in WebP format. This ensures visitors always receive the most efficient version of your images, without you needing to manually optimise or re-upload them.
Using WebP Images for Background Elements
When you enable automatic WebP conversion (via LiteSpeed Cache, ShortPixel, or similar), your site will generate .webp versions of each uploaded image, usually stored in the same directory as the original JPG or PNG.
However, when you set a background image (in a builder like Breakdance, Elementor, or Divi), WordPress doesn’t automatically replace the background JPG with its WebP equivalent. You’ll need to insert the WebP version manually.
Locate your WebP file When optimisation finishes, LiteSpeed stores the WebP version in the same folder as your original upload but the extension will be .webp.
- Original /wp-content/uploads/2025/09/webdesignpackages.jpg
- Litespeed WebP /wp-content/uploads/2025/09/webdesignpackages.jpg.webp

Step by Step – How to use and insert the WebP version manually.
- Select “Image” under Background Type: In your builder (Breakdance, Elementor, Divi, etc.), go to the background settings for your section or block and choose Image as the background type.
- Get your image’s file URL: Go to Media → Library and click on the original image, On the right-hand side, under File URL, click Copy URL to Clipboard.
- Choose “Insert from URL: Rather than uploading again, click the Insert from URL option in the media panel.
- Paste that link into the Insert from URL field and Modify the file extension.
Depending on your optimisation tool: Some WebP generators simply replace.jpgor.pngwith.webpOthers (like LiteSpeed) append.webpto the end (e.g.,image.jpg.webp) - When the file path is correct, you’ll immediately see a preview of the WebP background appear.
- Add Alt Text Alt text and captions don’t transfer when inserting a background image via URL. You don’t need a caption for backgrounds, but you should always include alt text to maintain accessibility and SEO context.
- Disable “Lazy Load” if necessary: For hero or above-the-fold sections, turn Lazy Load off to avoid background flicker or delayed rendering.
Questions about the Image SEO Technical Basics
Ever noticed your image looks sharper in one format but loads faster in another? Or that two “optimised” versions end up with totally different file sizes? That’s not a glitch, it’s how image formats and compression work. JPG, PNG, and WebP each handle colour, transparency, and data reduction differently. Understanding those differences helps you choose the right format for quality, speed, and SEO balance
Why You See Different Results with JPG, PNG, and WebP
When you upload an image, three factors decide whether it compresses properly or converts to WebP:
- The original file type and how it’s encoded.
- The optimisation plugin’s settings and API mode (lossy vs. lossless).
- Whether a cached or previously optimised version already exists.
Why does my JPG sometimes still serve as JPG and not WebP
That usually happens because of one of these:
- Plugin not regenerating thumbnails: If the WebP version wasn’t generated or linked in the
.htaccessrewrite rules yet. - Browser compatibility or caching: Some browsers (mainly Safari older versions) still fallback to JPG/PNG if they don’t request WebP.
- Existing cache or CDN copy: LiteSpeed or Cloudflare might be serving a cached JPG even after a WebP exists.
To fix this, Clear cache (both plugin + server), then regenerate thumbnails so the WebP versions are linked and indexed.
Why doesn’t my image compress any further?
If you’ve already optimised your JPG before uploading, it’s likely already near optimal compression, so plugins like ShortPixel or LiteSpeed can’t reduce size much more. ShortPixel (or similar tools) avoid degrading an image beyond a set threshold to maintain visual quality.
If the difference is minimal, they’ll skip recompressing altogether that’s a good thing, not an error.
Run images through a tool like Squoosh.app manually, it shows compression ratio vs. quality in real-time, so you can see exactly when the visual difference stops being meaningful.
Why is my manually saved WebP sometimes bigger than the JPG version?
If you export directly to WebP at 100% quality, it can easily end up larger than a 75%-quality JPG. When manually saving WebP, target 70–80% quality, the sweet spot for size vs. clarity.
When it doesnt compress further…
- The WebP format is efficient, but not always smaller. It depends on the image complexity and compression level.
- Simple images (like flat icons or vector-style graphics) compress beautifully in WebP.
- Complex, noisy photos (with gradients, textures, shadows) sometimes compress better as JPGs.
Why do I see huge file sizes (300–600KB) when the 100KB version looks the same?
Because your eyes (and most monitors) can’t detect the difference once compression passes about 80% quality. Those extra kilobytes are just redundant pixel precision that browsers don’t display any better.
Optimal file sizes
| Image Type | Recommended Dimensions | Target File Size |
|---|---|---|
| Featured / Hero Image | 1600–1920px width | 150–250KB (max 300KB) |
| Blog Inline Image | 1000–1200px width | 80–150KB |
| Gallery / Case Study Image | 1200–1600px width | 120–200KB |
| Thumbnail / Card Image | 400–800px width | <70KB |
My plugin isn’t compressing images, what do I do?
Resets all previously cached JPGs and forces new WebP conversions like this.
- Regenerate thumbnails (WordPress → Tools → Regenerate Thumbnails).
- Clear all image optimisation caches (LiteSpeed → Image Optimisation → Clear Queue).
- Restart optimisation queue.
- Ensure “Auto Request WebP” and “Auto Pull Cron” are enabled in LiteSpeed.
- Re-run optimisation, and wait for the queue to finish.
Does it matter if I upload PNG or JPG if they’ll end up as WebP?
Yes, because the starting file type still influences:
- Base color compression method
- File size (PNG = larger)
- Transparency support (only PNG or WebP handle transparency correctly)
Even if you convert to WebP later, starting with the right base format improves the compression outcome.
| If your image is… | Use this format before upload |
|---|---|
| Photograph, gradient, or natural scene | JPG |
| Logo, illustration, text overlay, transparency needed | PNG |
| Already compressed, no transparency | JPG |
| Needs alpha transparency but small size | WebP (manual export) |
How Brighter Websites Makes This Easy
If your site was built by Brighter Websites, you’re already covered, everything’s optimised for you from day one. Image optimisation doesn’t stop at compression and WebP conversion, we’ve built an entire system that takes care of social sharing visuals, SEO signals, and page performance automatically.
Every New website we build includes automated image compression, resizing, and next-gen format conversion, all configured behind the scenes for the best possible performance.
All you need to do is upload your image, the Brighter Site Essentials system handles the rest. You get clean, fast, AI-ready image optimisation by default, designed to make your content shine across both human and AI search experiences.
Here’s what it does,
Smart resizing: Uploaded images are automatically resized to the ideal dimensions for your layout, and you have full control if you need to change it for a special case or you
Optimised compression: Every image is compressed to reduce file size without noticeable loss in quality. Your pages stay sharp, but load lightning-fast.
Automatic WebP conversion: Images are converted to WebP format using LiteSpeed Cache and QUIC.cloud, giving you faster delivery and better Core Web Vitals, with zero manual setup required.
Optional AI-generated Alt Text: If your site includes SEOPress Pro, we take it one step further. Using OpenAI-powered image recognition, your image alt text is automatically generated based on the content of the image (though if you want strong local search signals – this only get part f the way and recommend you make contextual updates to the AI generated inputs.
Perfectly Sized Open Graph Images (OG): Every time you upload a featured image, your site automatically generates a 1200×630px (16:9) Open Graph version.
These OG images are:
- Stored in your site data for consistent social sharing
- Automatically embedded in your schema markup
- Optimised for Facebook, LinkedIn, X (Twitter), and Google Knowledge Panels
That means when your links are shared, they always display sharp, properly cropped, and on-brand — no manual resizing or guesswork required.
Preloaded Featured Images for Speed: Your featured images are automatically preloaded to improve Largest Contentful Paint (LCP) scores and create instant visual load feedback.
You can even add both background and above-the-fold images (in JPG or WebP format) to the preload list for better perceived performance and stability.
Advanced Scale system also includes Social-Ready 1080×1080 Thumbnails: For Facebook and social amplification campaigns, your site will also generate a 1080×1080px square thumbnail designed for maximum reach and visual balance. This image integrates directly with our social amplification module (via Make), ensuring your shared posts always use the optimal format for visibility, without relying on your site link to share the image.
Your site’s visuals automatically work across every platform, web, social, and AI search, with images that are perfectly sized, compressed, and schema-linked for performance, visibility, and engagement.
Don’t have professional photos? No problem. Read AI Image Generation Tips for Local Website Owners or take image based discovery to another level? – Read How to Get Your Website Images on Google
Subscribe to our blog
Occasional emails from Vanessa about AI, SEO, Website Marketing for regional service businesses.