Summary
Edit your website pages in Breakdance by clicking Edit with Breakdance and changing text or images visually. For Gutenberg, open the post, click a block to edit, then press Update. Always preview before publishing
Table Of Contents
Breakdance Builder is a powerful drag-and-drop tool that allows you to edit and design your website visually without coding. Here’s how you can add/edit content, manage site elements, and customize your website easily.
Quick Breakdance Overview
Check out this quick intro and overview – it should show you all you need to get started. otherwise check out the the Breakdance Basics Playlist for a serries of short 1-2min tutorials for editing particular elements and features of your breakdance websites
Official Playlist https://www.youtube.com/@OfficialBreakdance/playlists
Quick Breakdance Overview
Full Site Editing – Extended
First, Are you updating a page or a post?
| Posts | Pages |
|---|---|
| Appear in blog feed | Stand-alone content (like About or Contact) |
| Organised by date, category, tags | Organised hierarchically (parent/child) |
| Ideal for regular updates | Best for timeless content |
| Default Gutenberg Editor | Breakdance Builder |
Editing a Page in Breakdance
STEP 1 Opening a page in Breakdance builder
You can Add a new page or edit existing pages, to add or change content in Breakdance Builder
- Log in to your WordPress dashboard.
- Navigate to Pages → Click Edit in Breakdance

STEP 2 Edit An Element’s Design In Breakdance
- In your WordPress dashboard, go to Pages.
- Find the page you want to edit and click Edit with Breakdance.
- Hover over the element (text, button, image) you want to change and click on it.
- Make changes in the settings panel on the left:
- Text Content – Simply type to edit.
- Images – Click the image, then upload or select from the media library.
- Buttons/Links – Add or change a link in the button settings.
- Click Save Changes (Blue button top left of screen) when done.

Building a Page from Scratch in Breakdance
If you need to create a brand-new page, follow these steps:
- In your WordPress dashboard, go to Pages → Click Add New.
- Click Edit with Breakdance to open the page builder.
- Start adding sections:
- Use Pre-made Templates for quick designs.
- Drag and drop Headings, Text, Images, Buttons, and Sections.
- Adjust the design- select colours and fonts, and layouts in the settings panel.
- Following your Businesses branding guide or try to reuse the global colours and fonts to keep your websites style consistent.
- Click Save Changes when done.
How to Add or Update Blog Posts Using the Default Editor
Adding blog posts is a great way to keep your website fresh, improve SEO, and engage your audience. Here’s how to do it using the default WordPress editor.


Step 1: Create a New Blog Post or Open an existing one
- Log in to your WordPress dashboard.
- Navigate to Posts → Click Add New.
- Enter a title for your blog post at the top – this will be your H1 Title
Step 2: Add or Update Website Content in Your Blog Post
To update blog content, go to Posts → Click Edit on the post.
For the best layout, readability and SEO performance, use:
✔ Headings (H2 – 2nd level headings, H3 – 3rd level headings) to break up sections.
✔ Text paragraphs for clear and concise content.
✔ Lists (bulleted or numbered) for step-by-step guides or key points.
✔ Images or Video embeds to visually enhance the post.
✔ Links – links to other relevant web pages
You can also change elements from headings to paragraphs or from paragraph to lists and vice versa, or change your heading hierarchy as needed by selecting the element and clicking on the element icon,.


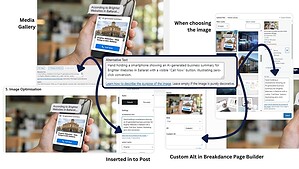
Step 3: Inserting Images (Best Practices)
- Click the “+” button and select Image.
- Upload a new image or choose one from the media library. You can also cut and paste an image into the content editor –
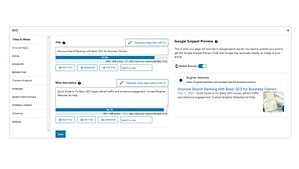
- Be sure to check the file name is relevant to the image and edit the Alt Text in the right hand side panel for better SEO.
- Avoid wrapping text around images – place images on separate lines for the best layout.
Step 4: Inserting Links (Best Practices)
- Add 3 to 5 internal links to other pages or posts that can link back to keywords in your other pages or posts.
- Insert 2 or 3 high quality external links to web pages that are relevant to the posts content or keywords
- The recommended number of internal and external links are based on approx. 800-1000 words
- Insert a link by selecting the text you want to link from
- Click on the link icon and search for a page or post
- Enter an external website URL making sure to include the https:// at the start.


Step 4: Update Website Content and Publish Your Blog Post
- Review your post for spelling, formatting, and readability.
- Click Preview to see how it looks.
- Click Publish when ready.
Need Help?
Need help with layout issues or want to improve your Content for SEO? Contact Brighter Websites for assistance!
Subscribe to our blog
Occasional emails from Vanessa about AI, SEO, Website Marketing for regional service businesses.