

I Thought I Didn’t Come From a Business Family. I Was Wrong.
I thought I didn’t come from a business family. Turns…
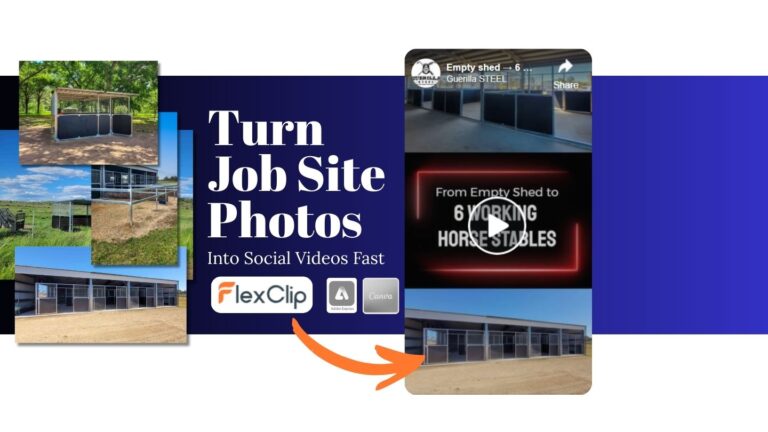
You can turn job site photos into social media videos quickly by using flex clips Apply & Auto Fill Feature, adding a few quick image fixes, and exporting a short reel in minutes. For most regional service businesses, this is one of the easiest ways to turn real project photos into proof content that builds trust online.
You’ve just finished a job.
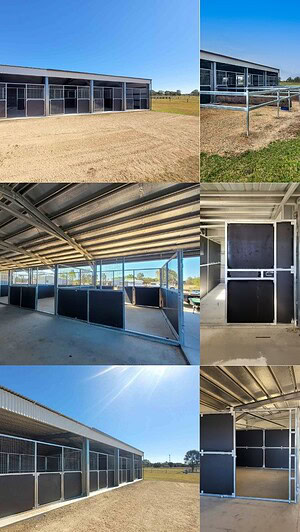
The work looks great. You took a bunch of photos while you were on site. Maybe a few before-and-after shots, maybe a couple of process images.
They’d make great social media content. Real job-site photos are some of the strongest proof content you can share.
But the photos sit in the camera roll… you either upload them as it to facebook or even worse – nothing ever happens with them.
The problem is time. Editing video sounds like a rabbit hole most business owners simply don’t want to go down.
Recently I was working on social media content for a client who sent me about 40 photos from different jobs completed over the last few weeks. Sorting through them, choosing the best shots, and turning them into usable content quickly became a fairly big task, and this is literally my job.
Now imagine being the business owner.
You’ve got a stack of photos from an onsite project and only a few minutes before moving on to the next task. Instead of letting those images sit unused, or just uploading a few random photos to Facebook, there’s a much better way to turn them into something more engaging.
All with a tool that has made a comeback for me with some very pleasant new surprises-
➜ FlexClip – a browser-based video editor
Let’s start with the actual workflow.
For me most of these tools have very similar feature lists – they pretty much all do the same thing to varying levels of efficiency and quality. What I want is a repeatable process I can run quickly.
Here’s how the full workflow looks
Done! That’s it.
See the exported Final in Flex Clip or the Video as a Facebook reel
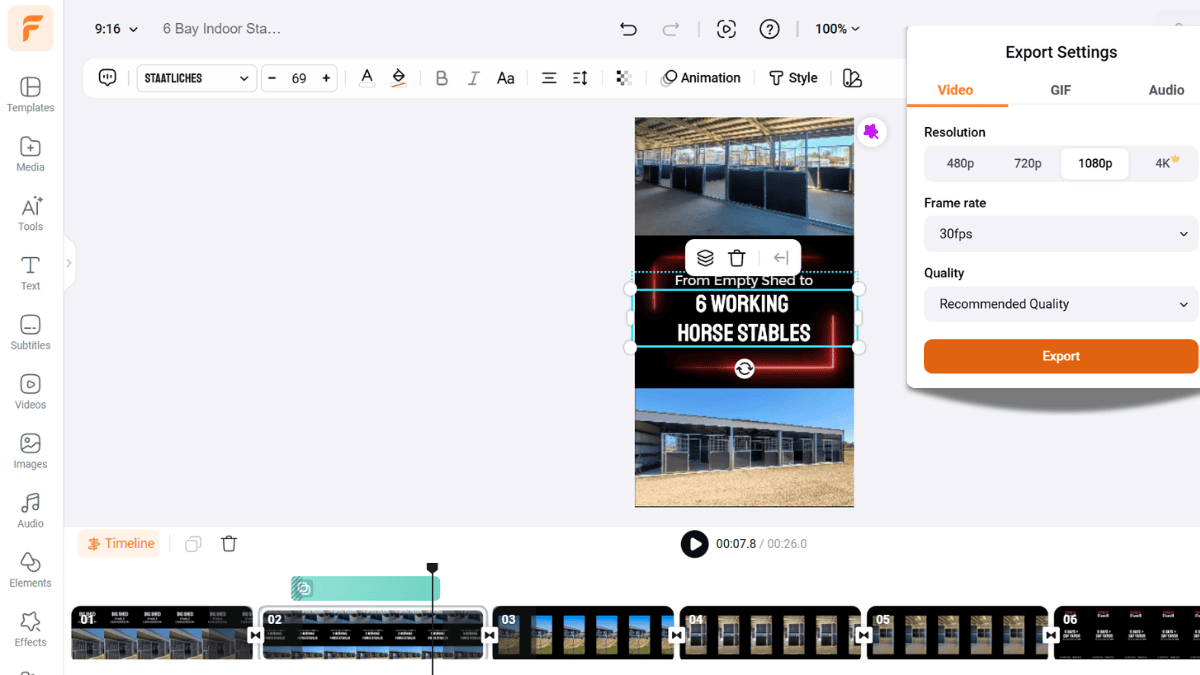
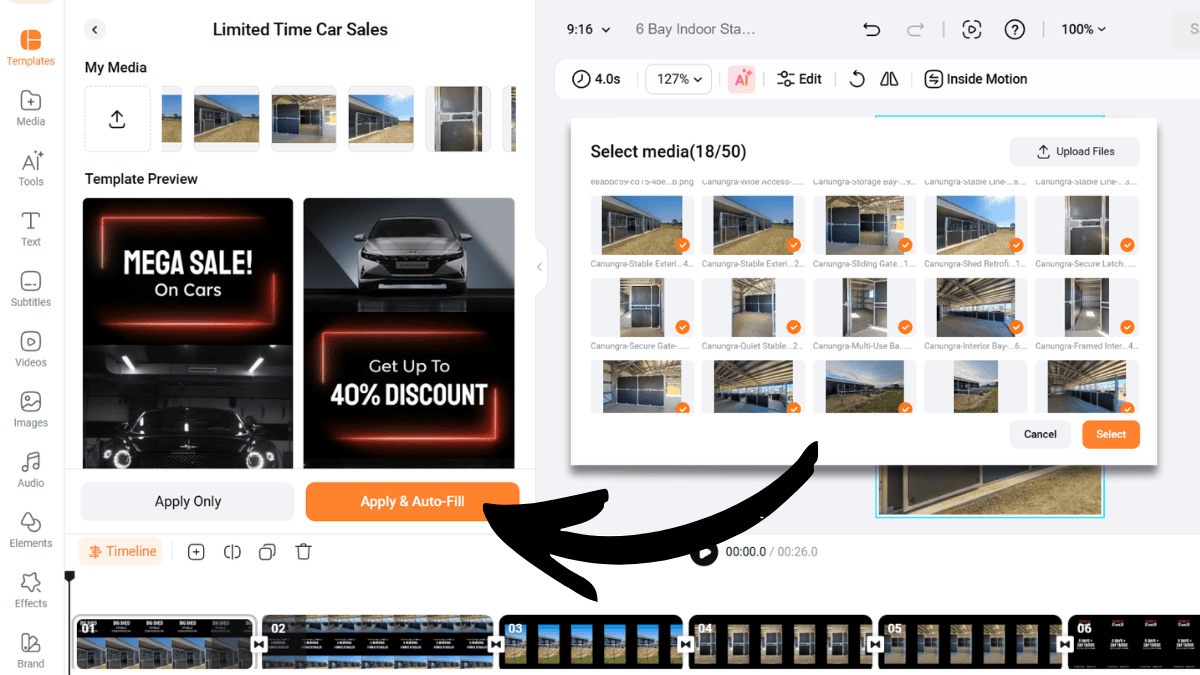
Instead of dragging images into each scene manually – like Canva and Adobe Express, FlexClip’s Apply & Auto Fill automatically inserts your photos into the template sequence. Once the images are placed, you simply adjust the captions (or images if you want different ones) if needed.
The entire process took me roughly five minutes.
And that’s the part that caught my attention. It turned real project photos into something publishable immediately.
For busy service businesses, that’s often the difference between posting content and never posting anything at all.
A few small adjustments can be the difference between a clip that looks rough and one that feels polished enough to represent your brand.
Before uploading the photos into the template, I did make a couple of small adjustments. If your original images are already well framed and high resolution, you can skip this step entirely.
For my clients I generally apply a few quick edits in Lightroom and sometimes Photoshop:
Those tweaks usually take 1–5 minutes, depending on how important the image will be for website content. But I’m always thinking ahead — making edits that will work for both the website and social media at the same time.
I try to avoid heavy AI editing on real project images. Trust matters, especially on project or case study pages, and overly manipulated images can undermine that trust.
The only time I typically use AI tools on project photos is when the original image is very small or blurry and needs to be upscaled to be usable. Tools like Topaz Gigapixel can help recover detail, although even the best AI upscaling tools still struggle with architectural or structural details.
If AI has been used to recreate or enhance an image significantly, I always recommend disclosing it and including the original photo as well. Even if the original looks rough, people generally appreciate the transparency.
One exception is creating missing “before” images.
Clients often forget to take them.
In those cases I may use AI tools to remove the completed work from an image to reconstruct a rough “before” reference. This works well for storytelling in project case studies — as long as it’s clearly explained that the image was generated.
This wasn’t my first time using FlexClip. I actually bought the FlexClip lifetime deal on AppSumo about two years ago in 2024. At the time my software stack looked very different.
Budget was tight.
Canva Pro wasn’t something I could justify yet, and Adobe Express wasn’t part of my workflow. FlexClip was one of the more affordable tools available for quickly creating marketing videos.
And to be fair, it worked. But it wasn’t perfect.
Back then the experience felt a bit clunky. The templates were decent, but editing still required quite a bit of manual effort. Building a simple video often meant dragging images into every scene one by one.
Eventually my workflow changed. Tools like Canva and Adobe Express became part of the stack. Both are excellent platforms with strong template libraries and polished interfaces.
FlexClip quietly faded into the background.
Until recently.
A few weeks ago I received an email explaining some of the newer features they had added. Out of curiosity I logged back in to test it again.
And the difference was noticeable almost immediately.
The standout improvement was the Apply & Auto Fill feature. This solves one of the biggest friction points in template video editors.
Normally when you choose a template you still need to manually place media into each scene. That can take longer than people expect, especially if the template contains many sections.
Auto Fill removes most of that friction.
For quick content, job highlights, process footage, testimonial snippets, this is a massive time saver.
It transforms video creation from a mini project into something closer to filling out a social media post.
There was another small detail that caught my attention.
The templates FlexClip recommended seemed to match my existing brand style surprisingly well. Colours and the general design style of the first few templates felt compatible with the content I was creating. I literally picked the 5th template that came up..
I’m not sure whether that was coincidence, recommendation logic, or the templates were just really versatile. But it meant I didn’t need to adjust colours during the test.
Which again reduced the editing time.
For quick project highlight reels, FlexClip surprised me. It doesn’t replace the other tools I use. I still work with Canva and Adobe Express regularly. Both are powerful platforms and excellent choices depending on what you’re building.
Each tool has a slightly different strength.
FlexClip seems to shine when speed matters most.
When you already have images and simply want to assemble a short reel quickly, the auto-populate workflow is extremely efficient.
Canva, on the other hand, is fantastic for brand consistency and csv to brand template media (love this). If you’re building social media graphics, marketing visuals, presentations, or polished assets, Canva’s ecosystem is hard to beat.
Adobe Express sits somewhere between the two. It offers strong creative flexibility and integrates well with the broader Adobe ecosystem — which I appreciate because I’m already paying for it. It definitely holds its own against Canva, and recently it’s even been integrated with ChatGPT for media creation directly inside chat.
So the real question isn’t “which tool is best.”
It’s which tool fits the job you’re doing right now.
FlexClip also offers several AI-driven tools. These include things like:
Personally, those aren’t features I rely on much. My blog content tends to be fairly technical. If I decide to turn an article into a video, I usually want much more control over the script and voice.
My workflow for that would probably look something like this:
That kind of content requires a more controlled editing process. So for me, FlexClip’s real strength isn’t automated blog videos.
Most of the time the biggest challenge with content isn’t creativity.
It’s consistency and momentum.
Sometimes the best tool is simply the one that lets you hit publish before the photos disappear into the archive.
These quick videos support something much bigger than social media posts. When they’re embedded on service pages, included in case studies, or shared alongside customer reviews, they strengthen the trust signals around your business.
And the good news is they’re much easier to produce than traditional marketing videos.
A handful of project photos can become a short reel in just a few minutes.
Most regional service businesses don’t need complex video production. What they really need is content that demonstrates experience, expertise, and real results.
Things like:
These small pieces of content build trust over time.
They show that work is actually happening. Potential clients can see the projects, understand what you do, and picture themselves working with you.
Used well, these clips serve a dual purpose.
They work as fast social media content, but they also help turn your website from a static brochure into a living record of real projects and outcomes.
And that’s incredibly powerful for businesses where the final sale happens offline through quotes, consultations, or proposals.
Discover more expert insights to the latest Web Design and SEO trends, these curated blog posts are designed to broaden your horizons and spark your imagination.


Hit submit and I’ll reach out by email or phone to help you get started. Your details stay private, see the Privacy Policy.